Computer network is a system consisting of computers and other network devices that work together to achieve a common purpose. The purpose of the computer network are:
Network Topology
Network Topology is, things that explains the geometric relationship between the basic elements of the network compiler, namely nodes, links, and the station.
There are six types of topology, namely:
Buses
Ring
Star
Extended Star
hierarchical topology
Mesh
Each topology have different characteristics and each has advantages and disadvantages. Topology does not depend on the medium and each topology usually use the media as follows:
Twisted Pair
Coaxial Cable
Optical Cable
Wireless
Topology is divided into two types, namely Physical Topology and Logical Topology. Below are the types of Physical Topology.
Types of Physical Topology:
• Bus Topology
This topology has the following characteristics:is a single cable which closed its two ends, where allnodes have cable commonly used for simple installation signal through the cable in two directions and possible collision. The biggest problem when a cable broke. If one of the broken cable segment, then the entire network to a halt.
• Ring Topology
This topology have following characteristics: closed circle containing nodes
simple layout signal flows in one direction, so it can avoid a collision (two packages of mixed data), enabling fasta data movement and collision detection is much simpler problem: the same as a bus topology ring topology is usually not made physically but realized with a consentrator and look like a star topology.
• Star Topology
This topology has the following characteristics: each node communicates directly with the central node, the data traffic flowing from the central node to node and back again. Easily developed, because every node only has a cable that directly connected to the central node advantages if one cable is disconnected the other nodes are not disturbed cable can be used which "lower grade" because only one traffic handle nodes, typically used UTP cable
• Extended Star Topology
Extended Star Topology is the continued development of the star topology where the characteristics are not much different with star topology, namely:
each node communicates directly with the sub-node, while the sub nodes to communicate with the central node. data traffic flowing from node to node and then forwarded to the sub-central node and back again.
Used on large networks and requires a lot of liaison or exceeds the maximum capacity of a liaison.
advantages: if one cable is lost then the sub nodes of other sub-node which does not interfere, but if the central node is lost then all the nodes in each sub-node will be disconnected
can not be used cables that "lower grade" because only one traffic menghandel node, because in order to communicate between one node to other nodes require several hops.
This topology is commonly referred to as topolodi tree. Built by as well as an extended star topology that is connected through sub nodes in a single central node. This topology can support both baseband and broadband signaling and also supports both contention and token bus access.
• Mesh Topology
MESH topology is constructed by placing a link between atation-station. A 'fully-connected mesh' is a network where each terminal is connected directly to all other terminals. Usually used on a small computer network. This topology enables the theoretical
but not practical and cost is high enough to be implemented. Mesh topology has a high level of redundancy. So if there is a broken link then a station can search for other links.
FDDI (Fiber Distributed-Data Interface) is a standard for data communication using optical fiber in the LAN with up to 200 km long.
FDDI protocol based on the Token Ring protocol. FDDI consists of two Token Ring, one of his ring-ring serves as a backup if ever there was the ring of the two rings are broken or a failure in the work. An FDDI ring has a speed of 100 Mbps.
Token Ring is a means of network access technology based ring that was originally developed and proposed by Olaf Soderblum in 1969. IBM company subsequently bought the copyrights of the Token Ring and Token Ring access use in IBM products in 1984. A key element of the design of IBM's Token Ring is IBM's own use of artificial connector (proprietary), using twisted pair cables, and install an active hub within a computer network.
There are three types of development from basic Token Ring: Token Ring Full Duplex, switched Token Ring and 100VG-AnyLAN. Token Ring Full Duplex using the bandwidth in both directions on a computer network. Switched Token Ring using a switch that transmits data between LAN segments (not in a single LAN devices). Meanwhile, 100VG-AnyLAN standard can support both Ethernet and Token Ring format at a speed of 100 Mbps.
• Ethernet.
Ethernet is a type of cabling and signal processing scenarios for data computer network that was developed by Robert Metcalfe and David Boggs at Xerox Palo Alto Research Center (PARC) in 1972.
Ethernet uses several methods to perform encapsulation of data packets into Ethernet frames, ie, as follows:
Ethernet II (used for TCP / IP)
Ethernet 802.3 (otherwise known as Raw 802.3 in a Novell network system, and is used to communicate with Novell NetWare 3:11 or previous versions)
Ethernet 802.2 (also known as Ethernet 802.3/802.2 without subnetwork Access Protocol, and is used for connectivity with Novell NetWare 3.12 and later)
SNAP Ethernet (also known as Ethernet 802.3/802.2 with SNAP, and made as compatibility with Macintosh systems running TCP / IP)
Unfortunately, each Ethernet frame format of the above are not mutually suitable / compatible with one another, making it difficult for network installation is heterogeneous. To overcome this, do configuration to the protocol used via the operating system.


4.Klik start maka proses pengkonversian pun dimulai. Tunggu setelah selesai proses konversi. Klik finish jika proses telah selesai.


6.Selamat sudah berhasil mengkonverensi file..
Membuat virtual PC
Dalam Sistem operasi yang telah didukung dengan baik yaitu Microsoft Virtual PC pada umumnya adalah masih berasal dari Microsoft seperti Windows 98, XP, Vista.
Saat kita melakukan demo pada platform windows XP SP2. Kita perlu ingat,bahwa untuk memory komputer yang akan digunakan minimal 1 giga dan free spaces minimal 10 giga. Sistem Operasi Guest dari Virtual PC menggunakan sebagian besar memory dari sistem operasi host (OS dimana virtual PC sedang berjalan).
Sebelum membuat virtual kita harus mengetahui bahwa yang disebut Guest adalah operating sistem pada virtual PC sedangkan Host adalah operating sistem yang asli.
Berikut ini adalah langkah-langkahnya :
1. Sebelumnya kita harus mendownloa dulu Microsoft Virtual PC 2007 SP1 dari http://www.microsoft.com/windows/downloads/virtualpc/default.mspx
Note: Installer Microsoft Virtual PC juga memerlukan software pendukung seperti windows intaller 4.5 keatas dan MSXML 6.0 keatas. Pastikan kalian telah memilikinya atau instalasi tidak dapat berjalan.
2. Setelah selesai mendownload, segera install. Langkah-langkah instalasi umumnya mudah (tinggal klik saja tombol Next)
3. Pilih Microsoft Virtual PC dari Start –> Program –> Microsoft Virtual PC atau jika sudah tersedia di dekstop tinggal klik saja.
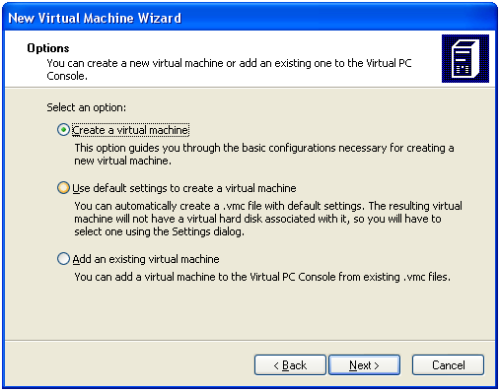
4. Jika belum mempunyai setting satu pun Virtual PC kalian akan mendapatkan Wizard seperti dibawah ini (lalu klik saja next)
5. Pilihlah create virtual machine lalu next.
6. Pilihlah sebuah nama untuk guest OS.Nama bebas tapi saya menuliskan “WinXP Test Platform” lalu next.
7. Lalu pilih windows XP dari drop down list.
8. Setelah itu pilih Adjust RAM harus menjadi 256 MB. Defaut RAM yang hanya 128 MB sangat kurang.
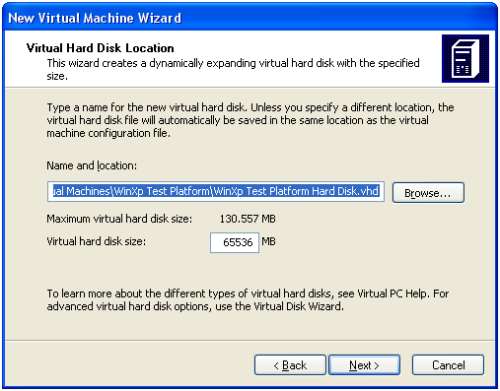
9.Selanjutnya pilih “A New virtual hardisk”lalu klik next.
10.Selanjutnya tentukan lokasi hardisk tersebut disimpan dan tentukan pula ukuran hardisknya.
11.Setelah Wizard selesai, klik saja finish.
12.Sebelumnya pastikan CD windows XP terdapat pada cdrom drive, dan start virtual machine. Ada 2 cara menjalankan virtual machine.Lalu klik start pada Virtual PC Console.
Note: Ada beberapa setting pada virtual machine masih grayed out karena Guest OS belum terinstall dan belum memiliki software “Virtual Machine addition”.
13.Melakukan instalasi seperti biasa (bagaimana cara menginstalasi windows XP diluar dari tutorial ini).

14.Setelah OS terinstall dan kalian dapat boot kedalam,waktunya menambahkan sebuah Virtual Machine Additions. Klik pada menu Action dan pilih “Install or Update Virtual Machine Additions”. Kalian akan mendapatkan warning, klik saja continue dan lakukan install. Setelah install selesai, restart system.
Note: Bila kalian merasa cursor mouse terjebak dalam OS Guest (tidak bisa move ke OS Host) tekan saja tombol ALT yang disebelah kanan keyboard (jangan yang kiri!).
15.Selamat kalian sudah membuat sebuah Virtual PC. Berikutnya adalah dasar-dasar manipulasi file.
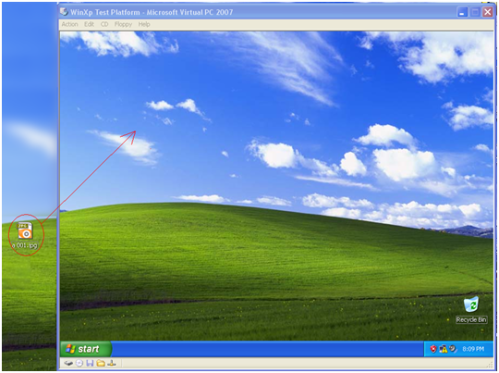
16.Untuk mengcopy sebuah file dari host ke guest, klik dan drag sebuah file dari desktop/folder ke dalam virtual pc seperti pada gambar dibawah ini.
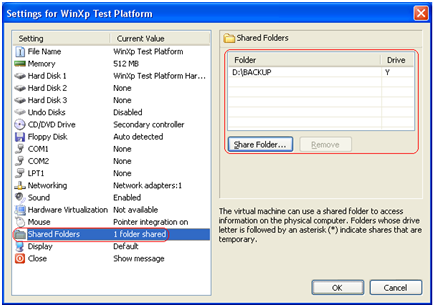
17.Selanjutnya ada cara lain yang lebih baik dalam membuat sebuah shared folder. Langkahnya adalah sebagai berikut:
1. Klik edit -> setting
2. Lalu pilih shared folder dan buat sebuah share folder
18.Menu setting juga dapat digunakan untuk mengedit nilai-nilai lain seperti besar memory etc.
Note:
1. USB Drive tidak didukung oleh virtual PC!
2. Ukuran file virtual PC cukup besar, bahkan sudah mencapai 1,4 gb padahal baru windows yang diinstall
Cara – cara Pengkonversian CD/DVD fisik menjadi CD/DVD Virtual dengan aplikasi Alcohol 52%
1. Pertama jika kita belum mempunyai aplikasi Alcohol 52% kita harus mendwonload terlebih dahulu,jika sudah terdapat pada PC langsung klik saja.
2. Klik saja aplikasi Alcohol 52% (saya menyimpannya di desktop).Lalu pilih “Image Making Wizard” pada tampilan awal aplikasi tersebut.
1. Pertama jika kita belum mempunyai aplikasi Alcohol 52% kita harus mendwonload terlebih dahulu,jika sudah terdapat pada PC langsung klik saja.
2. Klik saja aplikasi Alcohol 52% (saya menyimpannya di desktop).Lalu pilih “Image Making Wizard” pada tampilan awal aplikasi tersebut.

3. Selanjutnya pada bagian “Welcome to the Image Maker Wizard” pilihlah “Reading Options” ubah Image Location (saya menyimpannya di C) menjadi Image Format lalu pilih “Standard ISO Image File (*.iso)”. Kemudian klik start.

4.Klik start maka proses pengkonversian pun dimulai. Tunggu setelah selesai proses konversi. Klik finish jika proses telah selesai.


5. jika proses pengkonversian selesai, klik finish, maka file selesai di konversi.

6.Selamat sudah berhasil mengkonverensi file..


0 komentar:
Posting Komentar